The Online Quilt Block Pattern Library
You don't have to be a master at embroidery or
needlework to learn a few stitches that will give the
finishing touches to
your quilt. Using floss and an embroidery needle practice on a scrap of
fabric.
|
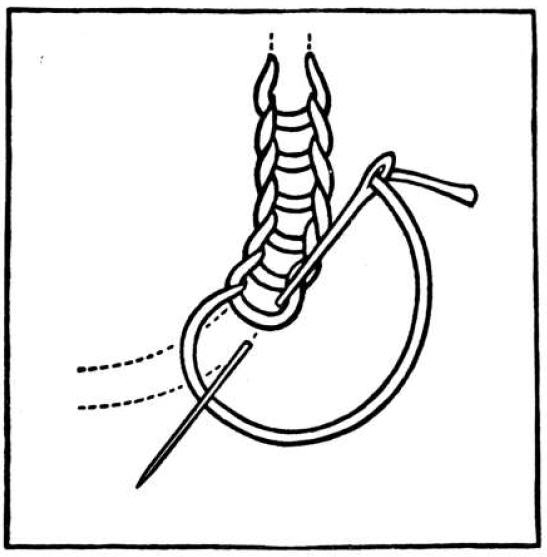
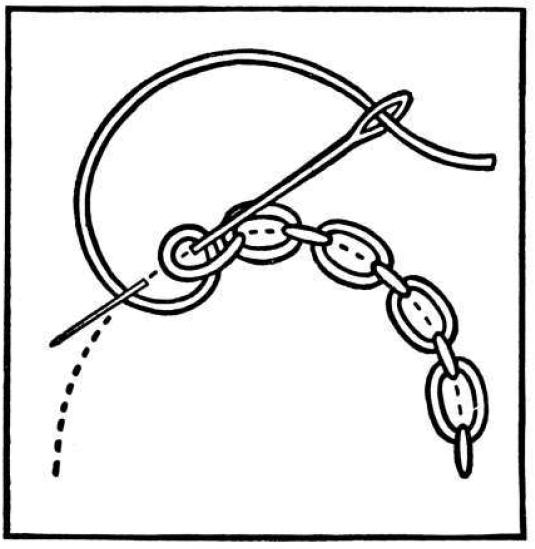
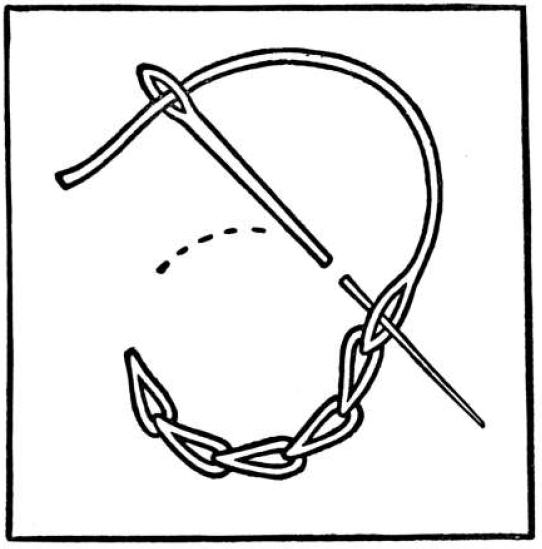
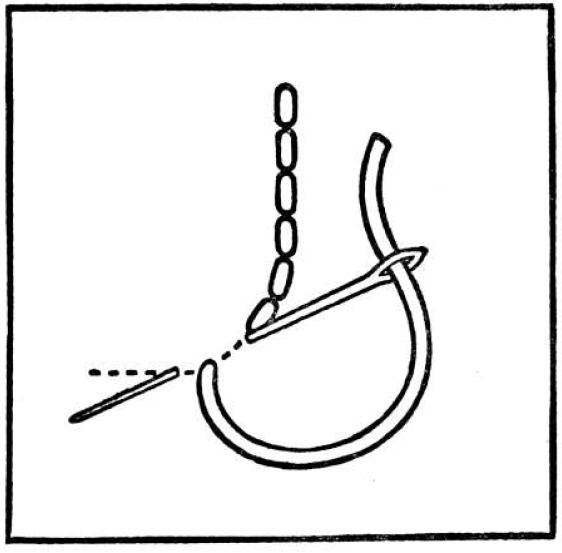
Chain Stitch To work chain stitch, bring the needle through at the top of the traced line, hold the working thread down towards the left with the thumb, insert the needle at the point where the thread has just come through and bring it up on the traced line about one-sixteenth of an inch further along, draw the thread through over the held down thread. It should show a neat line of back-stitching on the reverse side. The chain can be made broader by inserting the needle a little to the right, instead of at the exact point where the last thread came through. Care must be taken in the working not to draw the thread too tightly, as this stitch is inclined to pucker the material, especially when it is worked in curved lines.
|
|
|
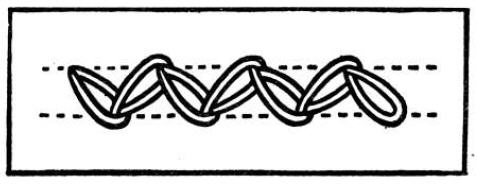
Zigzag Chain Stitch The common chain makes a particularly neat border stitch taken in zigzag fashion. To work this, trace two parallel lines on the material and work the chain across from side to side at an angle of 45° to the traced lines. For further security, catch down the end of the stitch just completed with the needle as it starts the following one. The line can be further decorated by placing a French knot, perhaps in a contrasting color, in each little triangular space left by working the stitch.
|
|
|
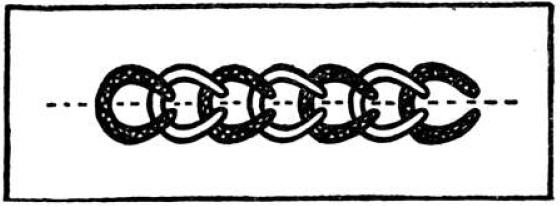
Chequered Chain Stitch There is an ingenious method of working ordinary chain stitch in a chequering of two colors. It is quite simple to work. Thread a needle with two different colored threads, start the chain stitch in the usual way until the thread has to be placed under the point of the needle for forming the loop. Place only one of the two threads underneath, leaving the other on one side out of the way, then draw the needle and thread through over the one held down. A chain stitch will have been formed with the thread that was looped under the needle. For the next stitch, the alternate thread is placed under, and so on, taking each thread in turn. The thread not in use each time usually requires a little adjustment to make it entirely disappear from the surface.
|
|
|
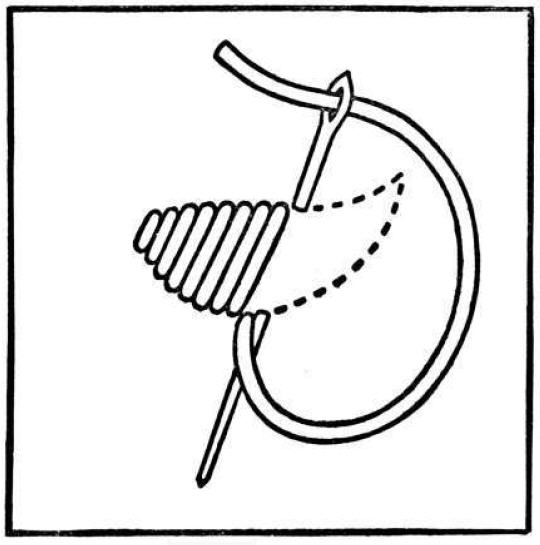
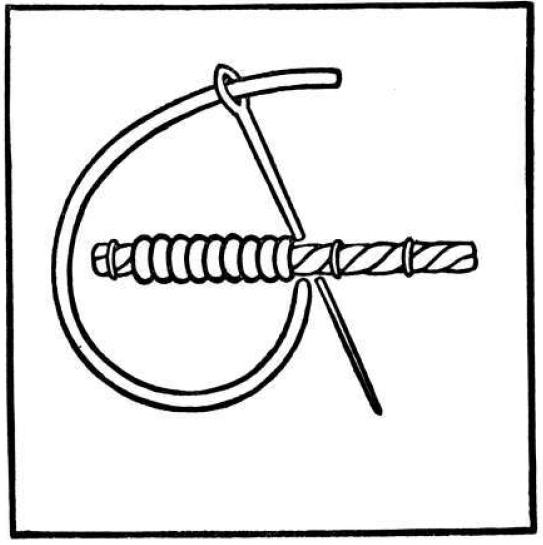
Rope Stitch An entirely different effect can be obtained by working this stitch much closer together, but in exactly the same way. It will then resemble a satin stitch slightly raised on one side. This is known as rope stitch and is at times very useful.
|
|
|
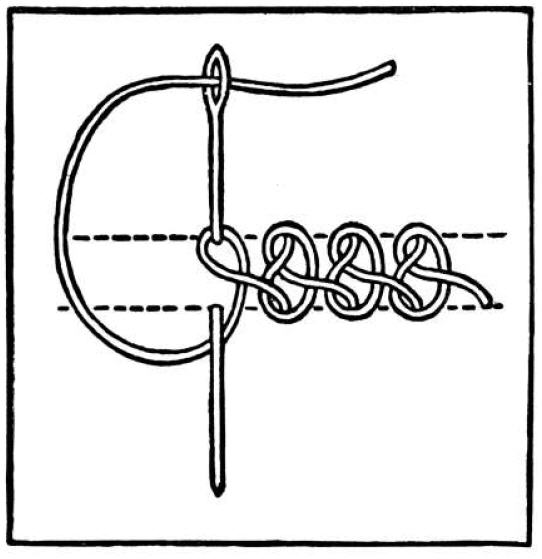
Open Chain Stitch Open chain stitch makes a good broad line; it looks best when worked with a heavy thread. To carry out the stitch, trace two parallel lines upon the material, about one-eighth of an inch apart, and bring the thread through at the top of the left-hand one. Hold the thread down with the thumb and insert the needle exactly opposite on the other line, bring it up one-eighth of an inch lower down and draw the thread through over the held down part, leaving a rather slack loop upon the material. Then insert the needle on the first line again, inside the slack loop, and bring it out one-eighth of an inch below. Repeat this on each side alternately.
|
|
|
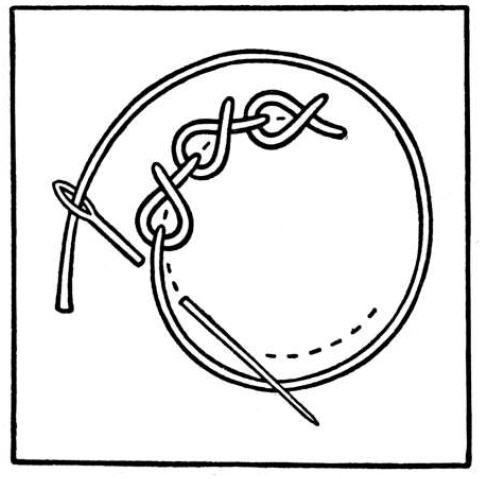
Braid Stitch Braid Braid stitch rather resembles a fancy braid laid upon the material. It looks best when carried out with a heavy twisted thread. To work it, trace two parallel lines upon the material about one-eighth of an inch apart, and bring the thread through at the right-hand end of the lower line. Throw the thread across to the left and hold it slackly under the thumb. Place the needle pointing towards the worker under this held thread, then twist it round towards the left and over the held thread until it points in the opposite direction. It will now have the thread twisted loosely over it. Next, insert the needle on the upper line one-eighth of an inch from the starting point, and bring it through on the lower line exactly underneath. Place the thumb over the stitch in process and draw the thread through as the diagram shows.
|
|
|
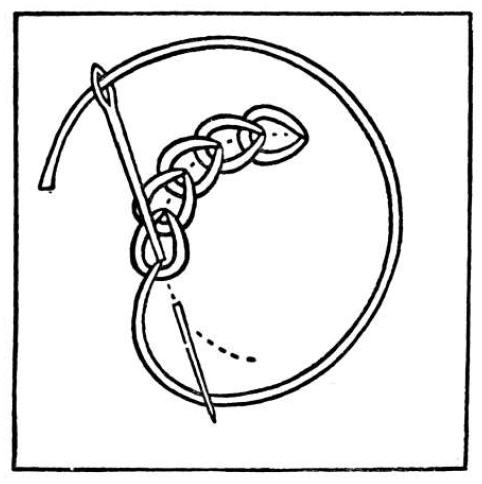
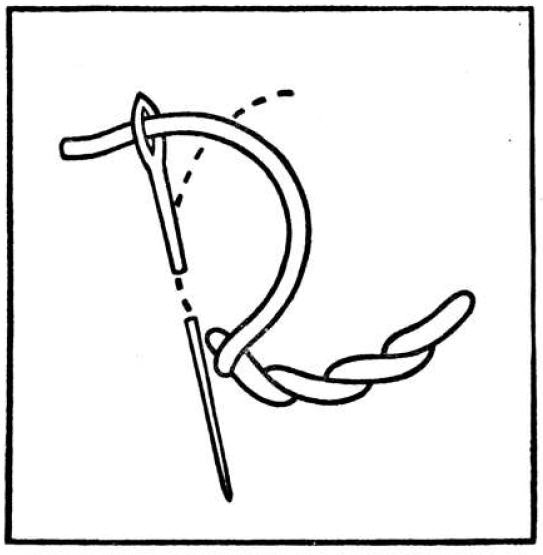
Cable Chain Stitch Cable chain is descriptively named, for when worked with a twisted thread, it has very much the appearance of a chain laid upon the material. To work it, bring the needle through at the top of the traced line, throw the thread round to the left and hold it down with the thumb near where it has come through the material. Pass the needle under the held down thread from left to right and draw it through until there is only a small loop left. Insert the needle in the center of this loop, on the traced line about one-sixteenth of an inch below the starting point. Bring it out a quarter of an inch below and outside the loop. Take the thread in the right hand and tighten the loop that has now been formed, and then pass the thread under the point of the needle towards the left. Place the left thumb over the stitch in process of making and draw the thread through; this will complete the first two links of the chain; to continue, repeat from the beginning.
|
|
|
Split Stitch Split stitch is a most useful one for many purposes. It is difficult to distinguish from a fine chain when done, but in the working it much more resembles stem stitch. To work it, bring the thread through at the lower end of the traced line, then insert the needle about one-eighth of an inch further along, and bring it through on the line two or three threads nearer the starting point; while bringing it through take it also through the center of the working thread, which then splits each stitch.
|
|
| Satin Stitch Satin stitch is perhaps the most commonly used of all stitches. It works up very quickly and needs no further instruction then is given by the diagram. Glossy or shiny floss looks best. The stitches may vary in length, although if the stitches are too short the shiny effect could be lost. The stitch is usually worked in oblique lines; stems, leaves, and petals are good examples.
|
|
| Stem Stitch Stem stitch is well known and frequently used for various purposes, such as lines, outlines, gradated and flat fillings, and so on. If a broad line is required the needle is put in more obliquely, and a raised effect can be obtained by working over a laid thread. The thread must be kept to the same side of the needle, either to the left or to the right as better suits the purpose in hand; the effect is more line like when it is kept to the right. |
|
| Overcast Stitch Overcast stitch in embroidery is practically a very short raised satin stitch. It requires neat workmanship, and then makes a bold clear line or outline. To work it, run or couch down a thread on the traced line, then with fine thread cover this over with close upright stitches, picking up as little material as possible each time in order to make the line clear and round. The stitch is worked most perfectly in a frame. |
|
| Back Stitch Back stitch sometimes makes a good line or outline. To work it, bring the needle through one-sixteenth of an inch from the end of the traced line, insert it at the start and bring it through again one-sixteenth of an inch beyond where it first came out. Each stitch, it will be seen, starts at the point where the last one finished. |
|
| Buttonhole Stitch There are two ways of forming the stitch, the common buttonhole and what is called tailor's buttonhole. To work the ordinary buttonhole stitch, bring the needle through at the left-hand end of the traced line, hold the thread down to the left with the thumb and insert the needle as shown in the diagram, draw it through over the held thread to complete the stitch. It is worked openly in the diagram, but it may, as required, be either more or less open or quite closed. |
|
| Tailor's Buttonhole Stitch The tailor's buttonhole is for some purposes more satisfactory; the stitch is firmer than the other kind owing to the heading having an extra knot in it; this makes it also more ornamental. To work it, start in the same way as the last stitch until the needle and thread are in the position shown then, with the right hand take hold of the thread near the eye of the needle, bring it down and loop it under the point from right to left, draw the needle and thread through over these two loops, and the first stitch is made. |
|
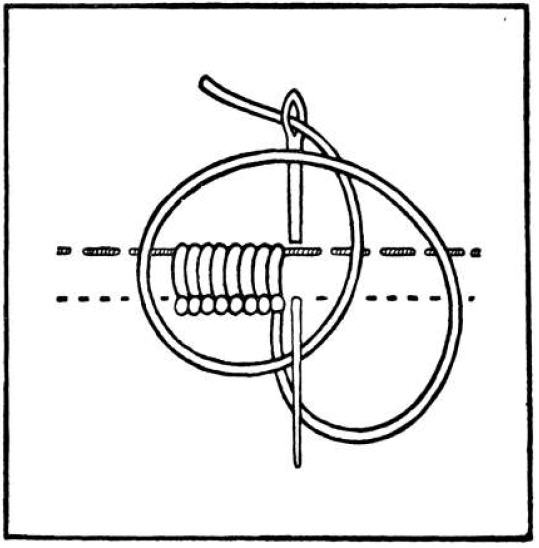
| French Knot French knots can be worked in the hand or in a frame. They are easier to manage in the latter, and to look good they must be neatly and firmly made. Completed they should resemble beads lying end upwards on the material. To work the French knot, bring the thread through the material at the required point, take hold of it with the left finger and thumb near the starting-point , then let the point of the needle encircle the held thread twice, twist the needle round and insert it close to the start point, draw the thread through to the back, not letting go the held thread until necessary. |
|
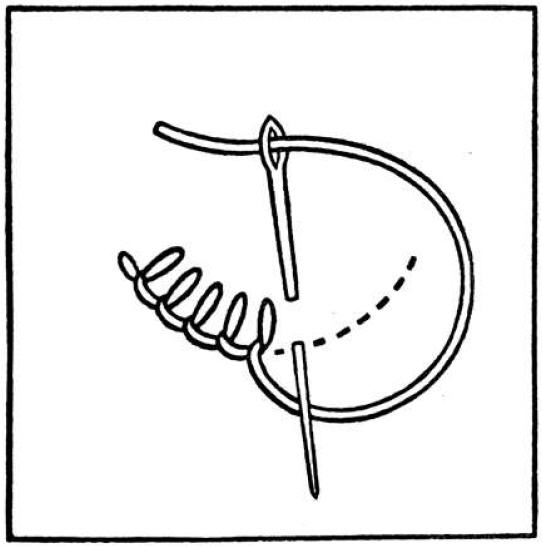
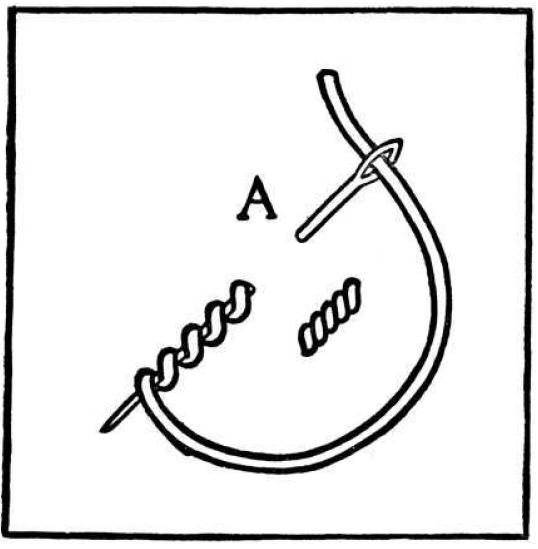
| Buillon Knot Bullion knots resemble tight curls of thread laid on the material. They can be used as a variation from French knots, and even for the representation of petals and small leaves. To be satisfactory they must be firm, stout, and tightly coiled; some knack is required to make them properly. To work the bullion knot, bring the thread through at the required place, insert the needle one-eighth of an inch from this point and bring it through again exactly at it. Take hold of the thread about two inches from where it came through and twist it several times round the point of the needle, the number of times being dependent on the required length of the knot. Place the left thumb upon the tight coil on the needle, in order to keep it in place, and draw the needle and thread through it, then pass the thread through to the back at the point where the needle was last inserted. The thumb must not be removed until it is in the way. |
|
|
Knotted Stitch The knotted stitch is a useful stitch when a jagged line is wanted, and can be seen used, for instance, for the branching veins in open work leaves |
|
| Feather Stitch The feather stitch is often used to decorate plain needlework. The stitch is so simple and so much in use it hardly needs need description as the diagram explains the working. |
|
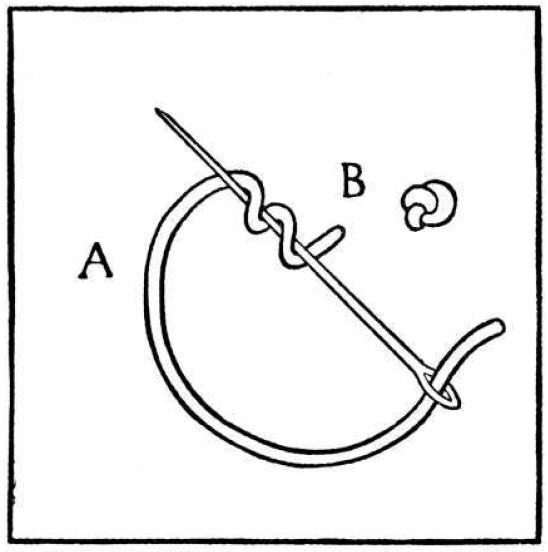
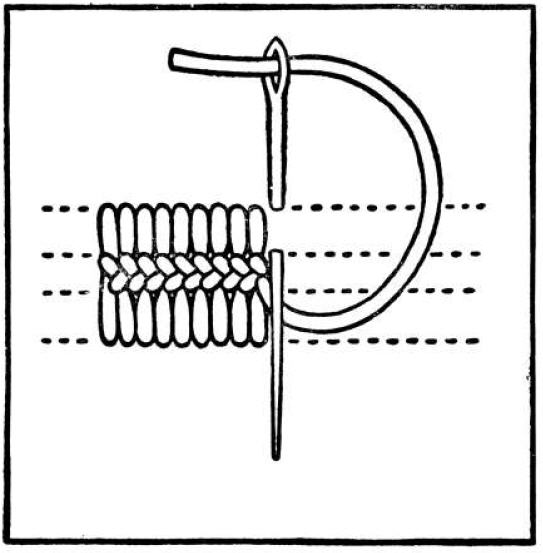
| Basket Stitch Basket stitch, useful for a solid line, shows up very clearly when worked with a heavy twisted thread. This stitch would be appropriately used when applied to some representation of basket work. To carry out the diagram, trace two parallel lines on the material, bring the thread through on the left-hand line, then insert the needle on the right-hand line about one-eighth of an inch lower down and bring it through on the left-hand line exactly opposite (see needle in diagram). The next stitch is worked by inserting the needle on the righthand line but above the last stitch, that is at point A on diagram, and bringing it through at B. To continue, repeat from the beginning. |
|
| Cretan Stitch The stitch shown in this diagram is known as plait or Cretan, it is commonly seen on Cretan and other Eastern embroideries. It can be used as a solid border stitch or as a filling, varying in width as required. To work it, bring the thread through on the lower central line, then insert the needle on the uppermost line and bring it through on the next below as in process in the diagram; then, still keeping the thread to the right, insert the needle immediately underneath on the lowest line and bring it through on the line next above, similar to the last stitch, but in reverse direction. To continue, work the stitch alternately on one side and the other, always keeping the thread to the right of the needle. In order to make the central plait broader take up rather less material with the needle; this will decrease the outer and increase the inner lines. |
|
|
© 2002-2008 Blockcrazy.com Send email to: webmaster@blockcrazy.com
|
|